Post by Morgan on Jun 6, 2009 20:25:18 GMT -6
For those who dislike those ugly "cartoony" skins, then read this.  Or if you just want new skins!
Our friends from MTS2 have already created fantastic things for our game.
www.modthesims.info/download.php?t=343769
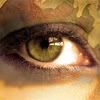
These skins look a tad more realistic, and a bit shiny too. I recommend reading a lot of the comments for how to install, etc.
Those are some steps to get them in your game working. The download system is pretty different compared to The Sims 2, but I'm sure we'll get use to it.
Enjoy and take a look at the other downloads! There are some pretty sa-weet ones.
 Or if you just want new skins!
Our friends from MTS2 have already created fantastic things for our game.
www.modthesims.info/download.php?t=343769
These skins look a tad more realistic, and a bit shiny too. I recommend reading a lot of the comments for how to install, etc.
Step 1 (Pre-Set Up):
Is this the first sims3 mod you are installing? If so, you need to make sure you have your folders set up properly.
Navigate to the installation folder of your sims3 game; for most users this is typically 'C:\Program Files\Electronic Arts\The Sims 3'. You should see, after a fresh install, 5 folders. These are: (caches, game, gamedata, support, thumbnails).
Getting to this folder is just step 1.
Step 2 (Make your mods folder):
In 'C:\Program Files\Electronic Arts\The Sims 3', make a folder called 'Mods' and then within THAT, a folder named 'Packages'. Make sure to capitalize, just in case.
Step 3 (get your config file):
Next, go here and look under "Summary". There is a link that says 'click here' for 'Resource.cfg'. Download 'Resource.cfg'.
Step 4 (put the config file in the right place):
Take your newly downloaded 'Resource.cfg' and place it in your base Sims 3 directory. This is, again, 'C:\Program Files\Electronic Arts\The Sims 3.' Do not place it in your 'Mods' or 'Packages' folder. It will not work.
Step 5 (get HP's files):
To use this particular mod, you have to decide what combination you want. You can have the following combinations;
shiny x1, male face x1, male body x1, female body x1, female face x1
or the above without the shiny.
Make sure you only download ONE set of skins. Pick either female barbie or female non-Barbie.
Step 6 (unzipping HP's files):
Once you have the appropriate files (one each of male and female face, shiny still being optional), unzip the '.rar' files. You will see a list of '.package' files.
Step 7 (placing HP's files):
All '.package' files, which are thesims3 mod files, go in your 'Packages' folder. If you set it up as we did in the first steps, this will be located at ''C:\Program Files\Electronic Arts\The Sims 3\Mods\Packages".
Step 8 (test it!):
Run the sims3 and open Create a Sim. Testing is quickest if you start a new town. Keep in mind this mod will not update existing sims unless you go to 'plan outfit' using the dresser, as this forces a minor CAS screen.
If you don't notice the difference, try experimenting. Take pictures of the sims before and after mod installs wearing bathing suits. Did their belly buttons change? Do they look less like mannequins? Make sure you don't have any mispellings in your folder setup. Also, make sure you put your .package files directly in your 'Package' folder, or else they may not work correctly.
Those are some steps to get them in your game working. The download system is pretty different compared to The Sims 2, but I'm sure we'll get use to it.

Enjoy and take a look at the other downloads! There are some pretty sa-weet ones.